DIY Wheel Alignment Guide
25th Jan 2016
The first step to performing DIY wheel alignment is to know when your car needs one. If you see that the tread on any one tire appears lower on one side of the car, or lower on one side of a tire than the other side, you have an alignment issue . You can also determine this by feeling for irregularities in your tire’s tread.
Another simple way to check for alignment issues is by driving your car. Taking your car for a short drive will help. If your vehicle is turning seems to naturally turn to one side or another while driving on a straight road, there is an alignment issue.
Click to jump to a section:
| Wheel Alignment Types |
Wheel Alignment Materials |
DIY Toe Alignment | DIY Camber & Caster Alignment |
Types of Wheel Alignments
Camber Alignment
|
|
|
|
| Cross Camber | Negative Camber | Positive Camber |
The “ camber” is the inward or outward tilt of your car’s wheels when looking at your car from the front. This refers to the vertical view of your tires. An easy way to imagine this is by looking at your keyboard. A straight alignment would a straight up and down line: “|”. If your tires have a “ negative camber”, they would be pointed in toward the car, like this: “/ ”. If they had a " positive camber", they would be pointed away from the car, like this: “ \ ”. If any of your tires are pointed inward or outward in relation to the axle, it’s a problem. The term “cross-camber” applies when there is a difference in camber between one side of the car and the other.
Toe Alignment
|
|
|
| Toe In | Toe Out |
The “toe” refers to the inward and outward angle of your car’s tires if you were seeing them from a bird’s eye view. It is often called the “ toe angle”. An easy way to think about this is with your own two feet. If your toes were angled inward, this would be toe-in. Angled outward, it would be toe-out. The same holds true for your car’s tires
Caster Alignment

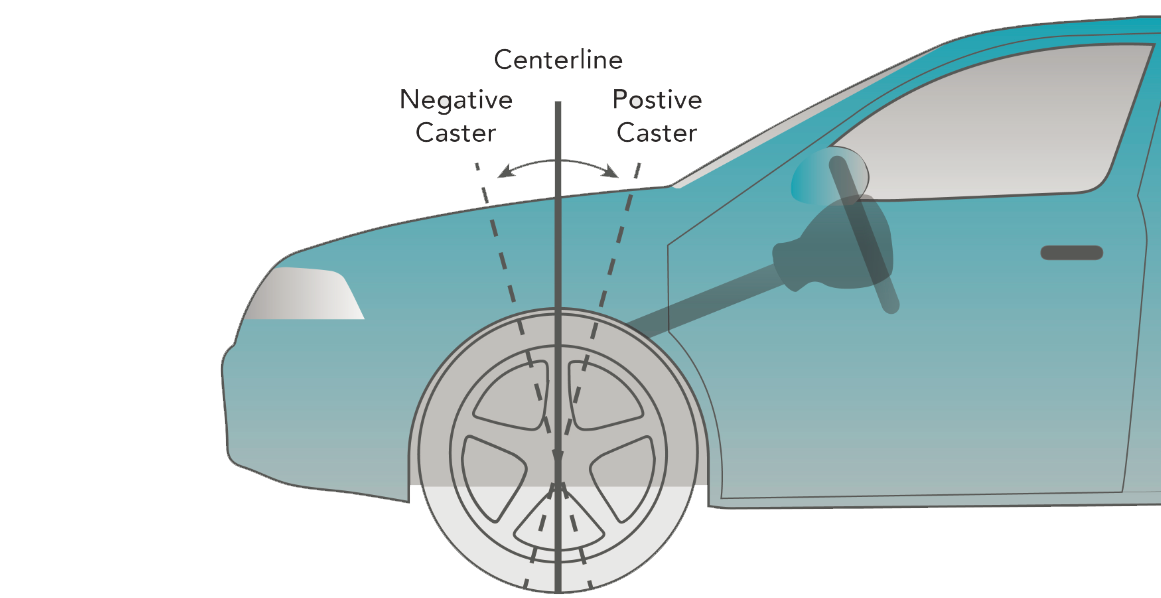
The “caster” refers to the angle of your steering axis (or pivot) when viewing your tires from the side. A perfectly aligned caster sees the steering axis pointing straight up and down.
A negative caster is where the steering pivot tilts toward the front of the car. A positive caster is where the steering pivot tilts toward the back of the car. This ultimately affects the stability of your steering and cornering.
Ackermann Effect
The Ackermann Effect describes the turn radius of your vehicle. If both inside and outside wheels turned at the same angle (known as parallel steering), the vehicle would have a very wide turning radius. However, Ackermann steering geometry has the inside steering wheel turn at a wider degree than the outside wheel. This allows the two wheels to create circles of different radii, but with a stable and tight turn. For this to work out,the steering arms of the front wheels must both be aligned to the center point of the rear axle.
Now that you know all about how your vehicle’s wheels are aligned, it’s time to begin the DIY alignment process. One of the first steps is to make sure to determine current alignment on your car.
Wheel Alignment Materials
- Tape measure
- A spool of string
- Four jack stands (four if you intend on doing all four wheels at the same time)
- Camber gauge
- 24mm wrench or adjustable wrench
- 13mm wrench
- Control arm shims
DIY Toe Alignment for Your Wheels
How To Measure The Toe With The“String Method”
Generally, the front and the rear of the vehicle will have different toe track settings. Before making an adjustment, make sure to review your car’s exact measurements. Quite often, the front wheels are slightly further out than the rear wheels. What you’re looking for when you are measuring is to see whether the distances are the same on both sides.
- Place the 4 tire jacks around the vehicle, preferably one on each of the four corners.
- Use your tape measure to ensure that the tire jacks are lined up perfectly with each other, as well as around 4-6 inches from your vehicle.
- Take your string and tie it to the jacks, all the way around. Place the string center to the hubcaps. Make sure that you car is completed boxed in by a line of string, and that the string is taut.
- Use your tape measure to determine the distance between the string and each of the tires. It’s best to use millimeters for this, as this is the measurement that your car manufacturer will use.
Your adjustments should be determined based on the differences between the front and the back tracks. If you discover that the rear track is further out than the front (the rear tracks are closers to the string), decrease the track to make it make even. If you find the rear track is closer in than the front (farther away from the string), increase the track.
How to Adjust the Toe Alignment of Your Wheels
- Locate the radius arms under and behind the rear wheels.

- Note the location of the clamps. You will want to return the clamps to this position afterward.
- Loosen the clamps holding the arm in place.
- Twist the arm in order to adjust the toe in or out. You should be able to determine which direction is required for your own vehicle with a bit of testing. Twist the arm in whichever direction (in or out) that is required to achieve the distance from the string that you need.
- Repeat for the other rear tire if needed.
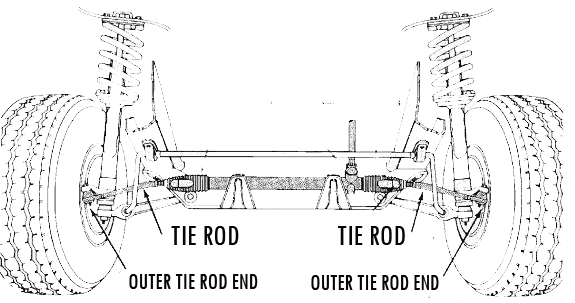
- Locate the tie rods in order to adjust the front. These be a little bit easier to see and reach.

- Note the location of the clamps on the tie rod.
- Loosen the clamps . The tie rod can be adjusted the same way as the radius arm, but turning the center point to move the tires.
- You only need to adjust one side, as the front wheels are measured together. Make sure to measure after each turn to ensure precision.
DIY Camber and Caster Alignment
Camber Alignment
- Attach the camber gauge to the center of your tire. You may need to remove the hubcap in order to ensure that the camber gauge is laid flat and straight against the middle of the tire.
- Adjust the gauge until it shows that it is straight. Check your car’s user manual. This should tell you how far the camber adjustment needs to be to meet the manufacturer’s specified degree. Not every car manufacturer has the wheels directly up and down at 0 degrees, for example.
- Remove the tire.
- Locate
the upper control arm.

- Use a wrench to adjust it however many degrees is necessary once you’ve located the upper control arm.
- Insert an equal number of shims on frame rail and cross-shaft mounting bolts. This will keep the setting you had just done in place.
Wheel Caster Adjustment
With the camber fix in place, the caster can be easily adjusted.
- Place the wheel back on.
- Adjust the tire inward 20 degrees.
- The camber gauge should have a caster adjustment knob. Using this, set the caster setting to zero.
- Move the tire 20 degrees outward. If your caster reading is negative, adding shims to the rear bolt will fix the problem.
Download or share the following infographic to know when you need a wheel alignment!

Sources:
http://www.firestonecompleteautocare.com/cf/alignment/is-it-time-for-a-wheel-alignment/
http://www.anewtoronto.com/wheel%20alignment.html
http://www.alignmycar.co.uk/cross-camber/
https://en.wikipedia.org/wiki/Ackermann_steering_geometry
http://www.rctek.com/technical/handling/ackerman_steering_principle.html
http://www.caranddriver.com/features/get-in-line-do-it-yourself-wheel-alignment
http://www.hummerknowledgebase.com/susp/string.html
http://www.bimmerforums.com/forum/showthread.php?1091836-Poor-man-s-alignment-DIY
http://www.lotus-europa.com/manuals/lotuswest/54WS094_files/FIG3.jpg
http://www.allpar.com/fix/alignment.html
http://s31.photobucket.com/user/fly300kts/media/Lower%20Arms/DSC03419Large.jpg.html


